web前端面试总结

CSS

flex 布局

  • 上下左右居中
1
2
3
4
5
6
7
8
9
10
11
12
13
14
15
16
17
18
19
20
21
22
//css
html,
body {
eight: 100%
}

.main {
display: flex;
height: 100%;
justify-content: center;
align-items: center
}

.box {
width: 300px;
border: 1px solid red;
}

//html
<div class="main">
<div class="box">上下左右居中</div>
</div>
  • 左右布局,一侧定宽,一侧自适应撑满
1
2
3
4
5
6
7
8
9
10
11
12
13
14
15
16
17
18
19
20
21
22
23
24
25
26
27
28
29
30
//css
html,
body {
height: 100%
}

.main {
display: flex;
height: 100%;
}

.left,
.right {
height: 100%;
border: 1px solid red;
box-sizing: border-box;
}

.left {
width: 300px;
}

.right {
width: 100%;
}
//html
<div class="main">
<div class="left">固定宽度300px</div>
<div class="right">自适应宽度</div>
</div>
  • 内容宽度等分
1
2
3
4
5
6
7
8
9
10
11
12
13
14
15
//css
.box {
display: flex;
}

.box div {
flex: 1;
border: 1px solid red;
}
//html
<div class="box">
<div>1</div>
<div>2</div>
<div>3</div>
</div>

css3 的新特性

  • 渐变
    线性渐变(Linear Gradients)- 向下/向上/向左/向右/对角方向
1
background: linear-gradient(direction, color-stop1, color-stop2, ...);

径向渐变(Radial Gradients)- 由它们的中心定义

1
background: radial-gradient(center, shape size, start-color, ..., last-color);
  • 过渡
属性 描述
transition 简写属性,用于在一个属性中设置四个过渡属性。
transition-property 规定应用过渡的 CSS 属性的名称。
transition-duration 定义过渡效果花费的时间。默认是 0。
transition-timing-function 规定过渡效果的时间曲线。默认是 “ease”。
transition-delay 规定过渡效果何时开始。默认是 0。
1
2
3
4
5
6
7
8
9
10
11
div {
transition-property: width;
transition-duration: 1s;
transition-timing-function: linear;
transition-delay: 2s;
/* Safari */
-webkit-transition-property: width;
-webkit-transition-duration: 1s;
-webkit-transition-timing-function: linear;
-webkit-transition-delay: 2s;
}
  • 动画
属性 描述
@keyframes 规定动画。
animation 所有动画属性的简写属性,除了 animation-play-state 属性
animation-name 规定 @keyframes 动画的名称
animation-duration 规定动画完成一个周期所花费的秒或毫秒。默认是 0。
animation-timing-function 规定动画的速度曲线。默认是 “ease”。
animation-delay 规定动画何时开始。默认是 0。
animation-iteration-count 规定动画被播放的次数。默认是 1。
animation-direction 规定动画是否在下一周期逆向地播放。默认是 “normal”。
animation-play-state 规定动画是否正在运行或暂停。默认是 “running”。
1
2
3
4
5
6
7
8
9
10
11
12
13
14
15
16
17
div {
animation-name: myfirst;
animation-duration: 5s;
animation-timing-function: linear;
animation-delay: 2s;
animation-iteration-count: infinite;
animation-direction: alternate;
animation-play-state: running;
/* Safari and Chrome: */
-webkit-animation-name: myfirst;
-webkit-animation-duration: 5s;
-webkit-animation-timing-function: linear;
-webkit-animation-delay: 2s;
-webkit-animation-iteration-count: infinite;
-webkit-animation-direction: alternate;
-webkit-animation-play-state: running;
}

用纯 CSS 创建一个三角形

1
2
3
4
5
6
7
8
9
10
11
12
13
14
 <style>
div {
width: 0;
height: 0;
border-top: 40px solid transparent;
border-left: 40px solid transparent;
border-right: 40px solid transparent;
border-bottom: 40px solid #ff0000;
}
</style>
</head>
<body>
<div></div>
</body>

CSS 的盒子模型

标准盒子模型:宽度=内容的宽度(content)+ border + padding

低版本 IE 盒子模型:宽度=内容宽度(content+border+padding)

如何让一个 div 水平居中

已知宽度,block 元素 ,添加添加 margin:0 auto 属性。
未知宽度,绝对定位的居中 ,上下左右都为 0,margin:auto

让一个 div 水平垂直居中

1
2
3
4
5
6
7
8
9
10
11
12
13
14
15
16
17
18
19
20
21
22
div {
position: relative;
width: 500px;
height: 300px;
top: 50%;
left: 50%;
margin-top: -150px;
margin-left: -250px;
/*外边距为自身宽高的一半 */
background-color: red; /* 方便看效果 */
}

.container {
display: flex;
align-items: center; /* 垂直居中 */
justify-content: center; /* 水平居中 */
}
.container div {
width: 100px; /* 可省 */
height: 100px; /* 可省 */
background-color: red; /* 方便看效果 */
}

三栏布局,左右固定,中间自适应

1
2
3
4
5
6
7
8
9
10
11
12
13
14
15
16
17
18
19
20
21
22
23
24
25
26
27
28
29
30
31
32
33
34
35
36
37
38
39
40
41
42
<style>
* {
margin: 0;
padding: 0;
}
.middle,
.left,
.right {
position: relative;
float: left;
min-height: 130px;
}
.container {
padding: 0 220px 0 200px;
overflow: hidden;
}
.left {
margin-left: -100%;
left: -200px;
width: 200px;
background: red;
}
.right {
margin-left: -220px;
right: -220px;
width: 220px;
background: green;
}
.middle {
width: 100%;
background: blue;
word-break: break-all;
}
</style>
</head>
<body>
<div class='container'>
<div class='middle'></div>
<div class='left'></div>
<div class='right'></div>
</div>
</body>

CSS 优先级

1
2
3
4
5
6
7
8
9
10

同级别:总结排序:!important > 行内样式>ID选择器 > 类选择器 > 标签 > 通配符 > 继承 > 浏览器默认属性
1.属性后面加!import 会覆盖页面内任何位置定义的元素样式
2.作为style属性写在元素内的样式
3.id选择器
4.类选择器
5.标签选择器
6.通配符选择器(*)
7.浏览器自定义或继承
**同一级别:后写的会覆盖先写的**

JS

ES6 的新特性 此条必问~

参考这篇文章 https://blog.csdn.net/zgrkaka/article/details/82863445

什么是闭包

闭包的定义很简单:函数 A 返回了一个函数 B,并且函数 B 中使用了函数 A 的变量,函数 B 就被称为闭包。

js 检测数据类型的方法

  • typeof
1
2
3
4
5
6
7
8
console.log(typeof "");
console.log(typeof 1);
console.log(typeof true);
console.log(typeof null);
console.log(typeof undefined);
console.log(typeof []);
console.log(typeof function() {});
console.log(typeof {});

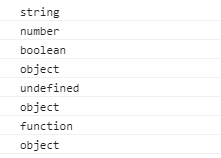
149117849

typeof 对于基本数据类型判断是没有问题的,但是遇到引用数据类型是不起作用的。

  • instanceof
1
2
3
4
5
6
7
8
console.log("1" instanceof String);
console.log(1 instanceof Number);
console.log(true instanceof Boolean);
// console.log(null instanceof Null);
// console.log(undefined instanceof Undefined);
console.log([] instanceof Array);
console.log(function() {} instanceof Function);
console.log({} instanceof Object);

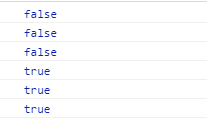
20171003141627521-927563737

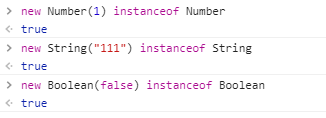
可以看到前三个都是以对象字面量创建的基本数据类型,但是却不是所属类的实例,这个就有点怪了。后面三个是引用数据类型,可以得到正确的结果。如果我们通过 new 关键字去创建基本数据类型,你会发现,这时就会输出 true,如下:
1248022-20171003142217802-1412540288

接下再来说说为什么 null 和 undefined 为什么比较特殊,实际上按理来说,null 的所属类就是 Null,undefined 就是 Undefined,但事实并非如此:控制台输出如下结果:

1248022-20171003142534599-1150711103

浏览器压根不认识这两货,直接报错。在第一个例子你可能已经发现了,typeof null 的结果是 object,typeof undefined 的结果是 undefined

  • Object.prototype.toString.call()
1
2
3
4
5
6
7
8
9
10
let a = Object.prototype.toString;

console.log(a.call("aaa"));
console.log(a.call(1));
console.log(a.call(true));
console.log(a.call(null));
console.log(a.call(undefined));
console.log(a.call([]));
console.log(a.call(function() {}));
console.log(a.call({}));

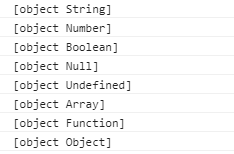
12480221708327412

完美的检测了所有的数据类型

谈一谈深拷贝和浅拷贝

1
2
3
//浅拷贝方法
// Object.assign()
// ...
1
2
3
4
5
6
7
8
9
10
11
12
13
14
15
16
17
18
19
20
21
22
//深拷贝  递归
function deepClone(obj) {
let objClone = Array.isArray(obj) ? [] : {};
if (obj && typeof obj === "object") {
for (key in obj) {
if (obj.hasOwnProperty(key)) {
//判断ojb子元素是否为对象,如果是,递归复制
if (obj[key] && typeof obj[key] === "object") {
objClone[key] = deepClone(obj[key]);
} else {
//如果不是,简单复制
objClone[key] = obj[key];
}
}
}
}
return objClone;
}
let a = [1, 2, 3, 4],
b = deepClone(a);
a[0] = 2;
console.log(a, b);
1
2
3
4
5
6
7
8
9
10
11
12
//深拷贝
//JSON对象的parse和stringify
function deepClone(obj) {
let _obj = JSON.stringify(obj),
objClone = JSON.parse(_obj);
return objClone;
}
let a = [0, 1, [2, 3], 4],
b = deepClone(a);
a[0] = 1;
a[2][0] = 1;
console.log(a, b);

call apply bind 的区别和实现方式

1
2
3
4
5
6
7
8
9
10
11
12
13
14
15
// call, apply, bind的区别
var a = { value: 1 };
function getValue(name, age) {
console.log("arguments in fn = ", arguments);
console.log(name, age);
console.log(this.value);
}
getValue.call(a, "yuwangi1", 17);
let bindFoo = getValue.bind(a, "testBind", 45);
console.log("bindFoo = ", bindFoo);
bindFoo();
getValue.apply(a, ["yuwangi2", 18]);
var returnedFunc = getValue.bind(a, "yuwangi3", 19);
console.log(returnedFunc);
returnedFunc();

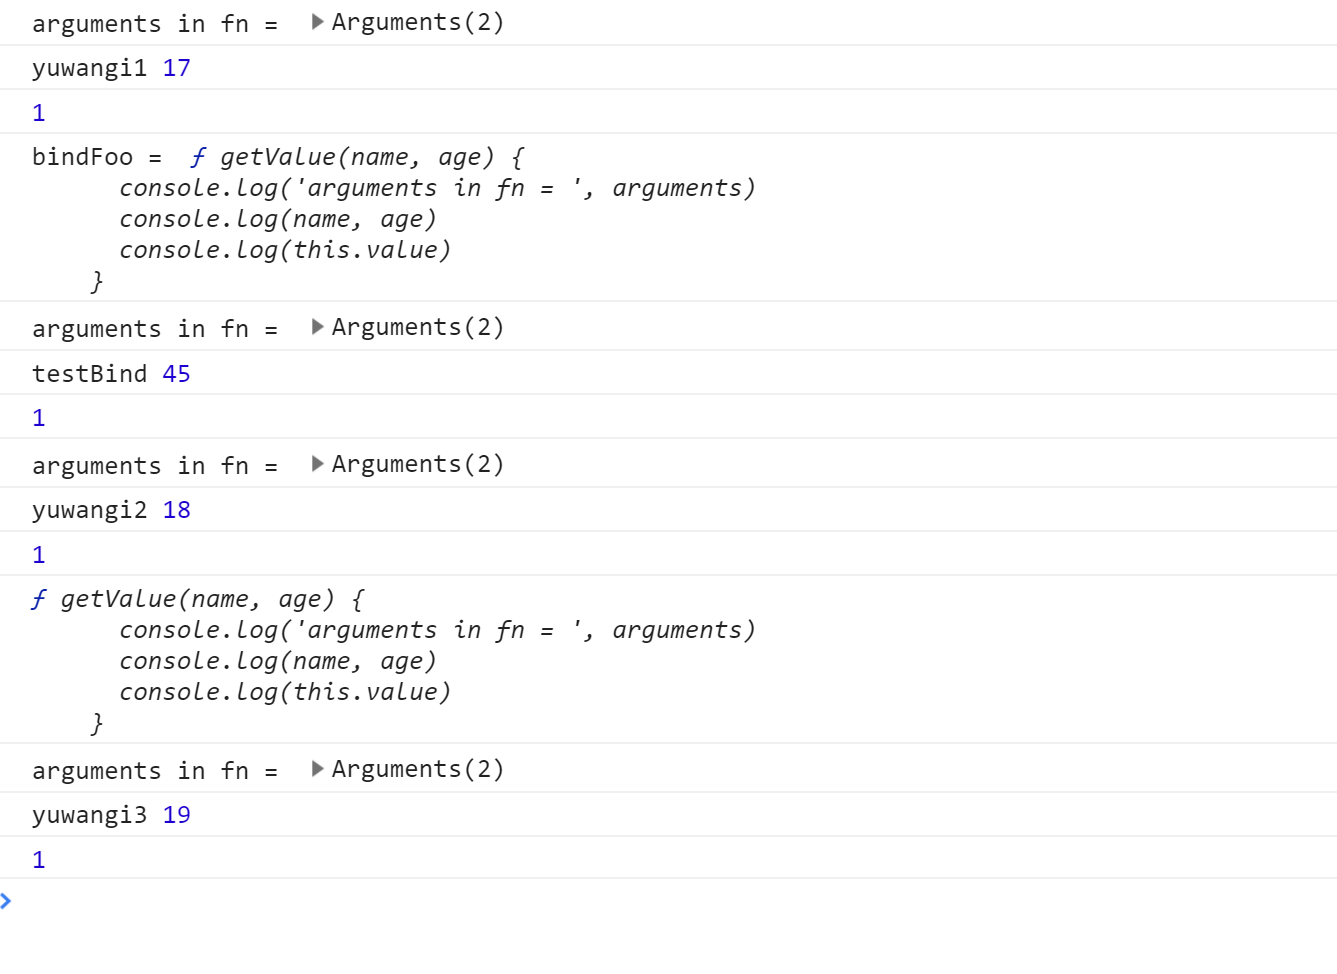
执行结果:

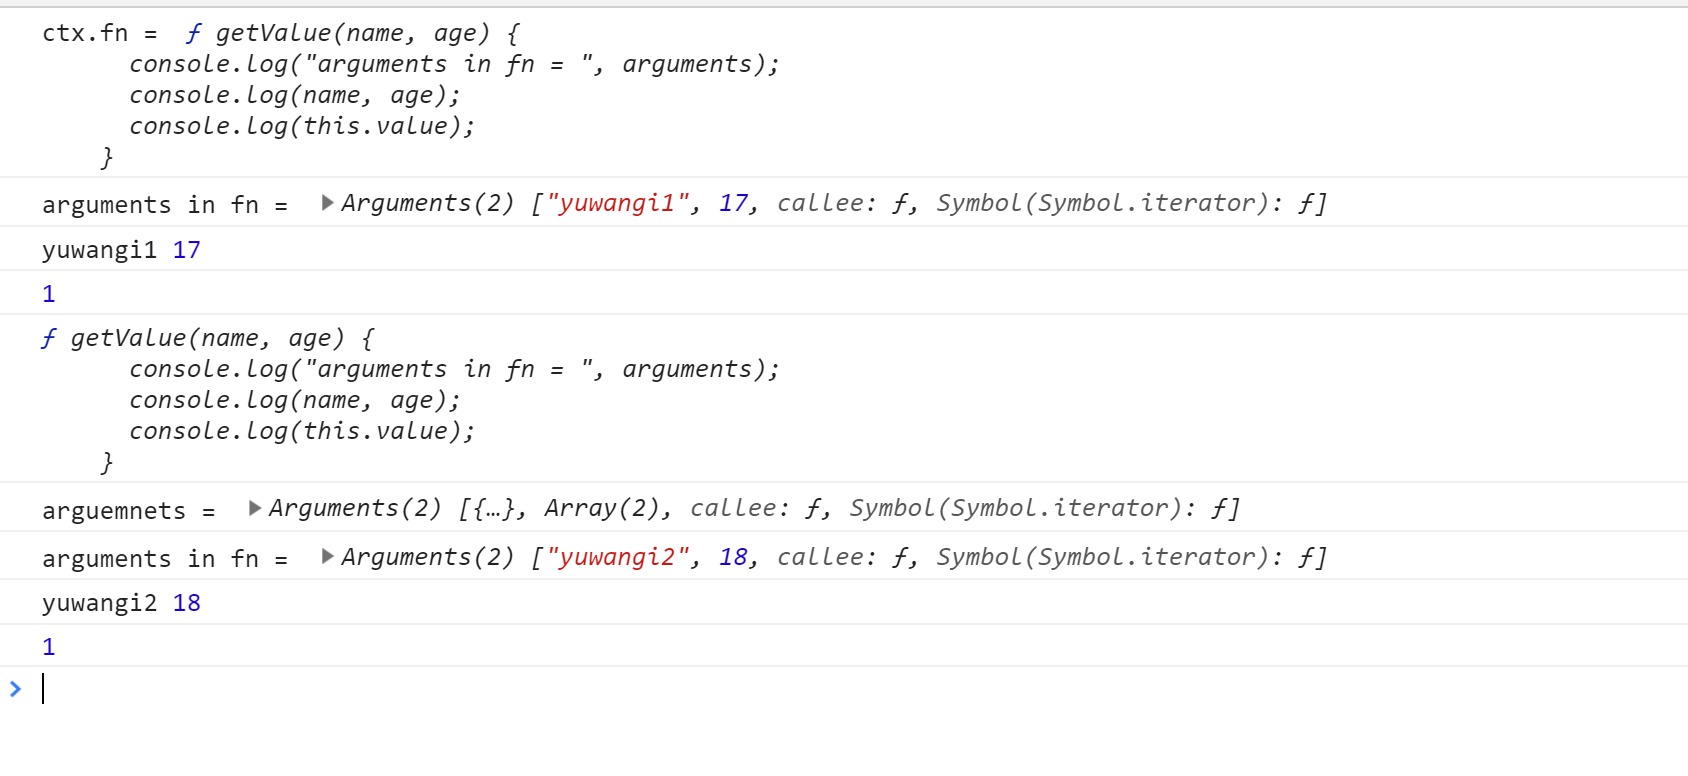
1641616161651684

可以看到,call, apply 都是直接返回函数执行后的结果,而 bind 是返回一个函数,之后手动执行之后才会将结果返回。

  • 手写 call 方法
1
2
3
4
5
6
7
8
9
10
11
12
13
14
15
16
17
18
19
20
21
22
23
24
25
26
27
28
29
30
31
// 手写模拟call方法的思想
/**
* call方法思想:改变this指向,让新的对象可以执行这个方法
* 实现思路:
* 1、给新的对象添加一个函数(方法),并让this(也就是当前绑定的函数)指向这个函数
* 2、执行这个函数
* 3、执行完以后删除这个方法
* 4、可以将执行结果返回
*/
Function.prototype.myCall = function(funcCtx) {
// funcCtx是当前要调用函数的对象
console.log("funcCtx = ", funcCtx);
// this指被调用的函数
console.log("this = ", this);
if (typeof this != "function") {
throw new TypeError("Erorr");
}
let ctx = funcCtx || global;
console.log("arguemnets = ", arguments);
let args = [...arguments].slice(1);
console.log(`args = ${args}`);

ctx.fn = this; // 为当前对象添加一个函数fn, 值为要已经定义的要调用的函数
console.log("ctx.fn = ", ctx.fn);
// 执行添加的函数fn
var result = ctx.fn(...args);
// 执行完以后删除
delete ctx.fn;
return result;
};
getValue.myCall(a, "test", 20);
  • 手写 apply 方法
1
2
3
4
5
6
7
8
9
10
11
12
13
14
15
16
17
18
19
20
// apply
Function.prototype.myApply = function(funcCtx) {
console.log(this);
if (typeof this != "function") {
throw new TypeError("Erorr");
}
let ctx = funcCtx || global;

ctx.fn = this;
console.log("arguemnets = ", arguments);
let result;
if (arguments[1]) {
result = ctx.fn(...arguments[1]);
} else {
result = ctx.fn();
}
delete ctx.fn;
return result;
};
getValue.myApply(a, ["eo", 50]);
  • 手写 bind 方法
1
2
3
4
5
6
7
8
9
10
11
12
13
14
15
16
17
18
19
20
21
//bind实现
/**
* 实现思想:
* 1、返回一个函数,其他与call, apply类似
* 2、如果返回的函数作为构造函数,bind时指定的 this 值会失效,但传入的参数依然生效。
*/
Function.prototype.myBind = function(funcCtx) {
let ctx = funcCtx || global;
console.log(this);
let _this = this;
let args = [...arguments].slice(1);
// 作为构造函数使用
let Fbind = function() {
let self = this instanceof Fbind ? this : ctx;
return _this.apply(self, args.concat(...arguments));
};
let f = function() {};
f.prototype = this.prototype;
Fbind.prototype = new f();
return Fbind;
};

执行结果:

20191029163401

谈谈原型链

javascript中万物皆对象。每个对象都有属于它的类,比如自然界中大象属于动物,火腿属于食物…,在 js 中每个实例也有它的类。

比方说现在我创建一个Person类。

1
2
3
4
5
6
7
8
9
10
11
12
13
14
15
class Person {
//定义了一个名字为Person的类
constructor(name, age) {
//constructor是一个构造方法,用来接收参数
this.name = name; //this代表的是实例对象
this.age = age;
}
say() {
//这是一个类的方法
return "我的名字叫" + this.name + "今年" + this.age + "岁了";
}
}
var obj = new Person("yuwangi", 18);
console.log(obj.say()); //我的名字叫yuwangi今年18岁了
console.log(obj.prototype);

20191029164937

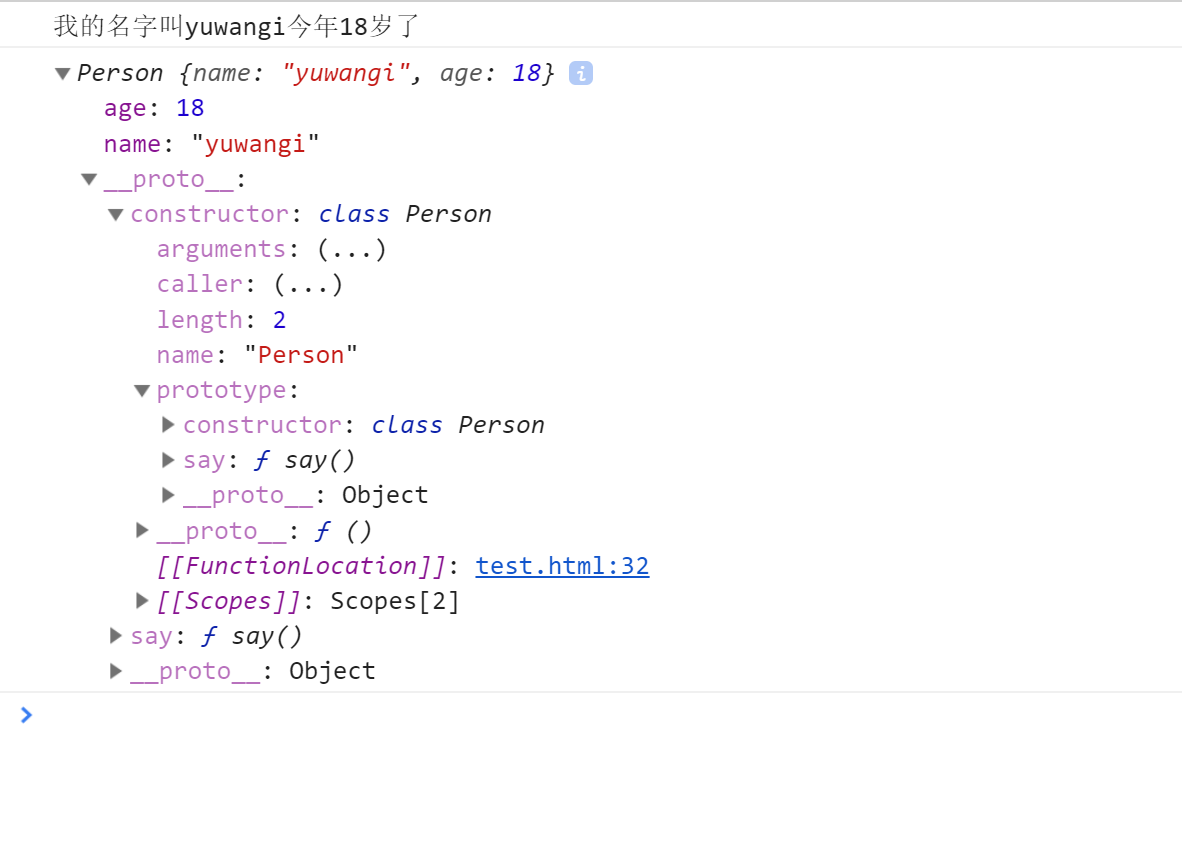
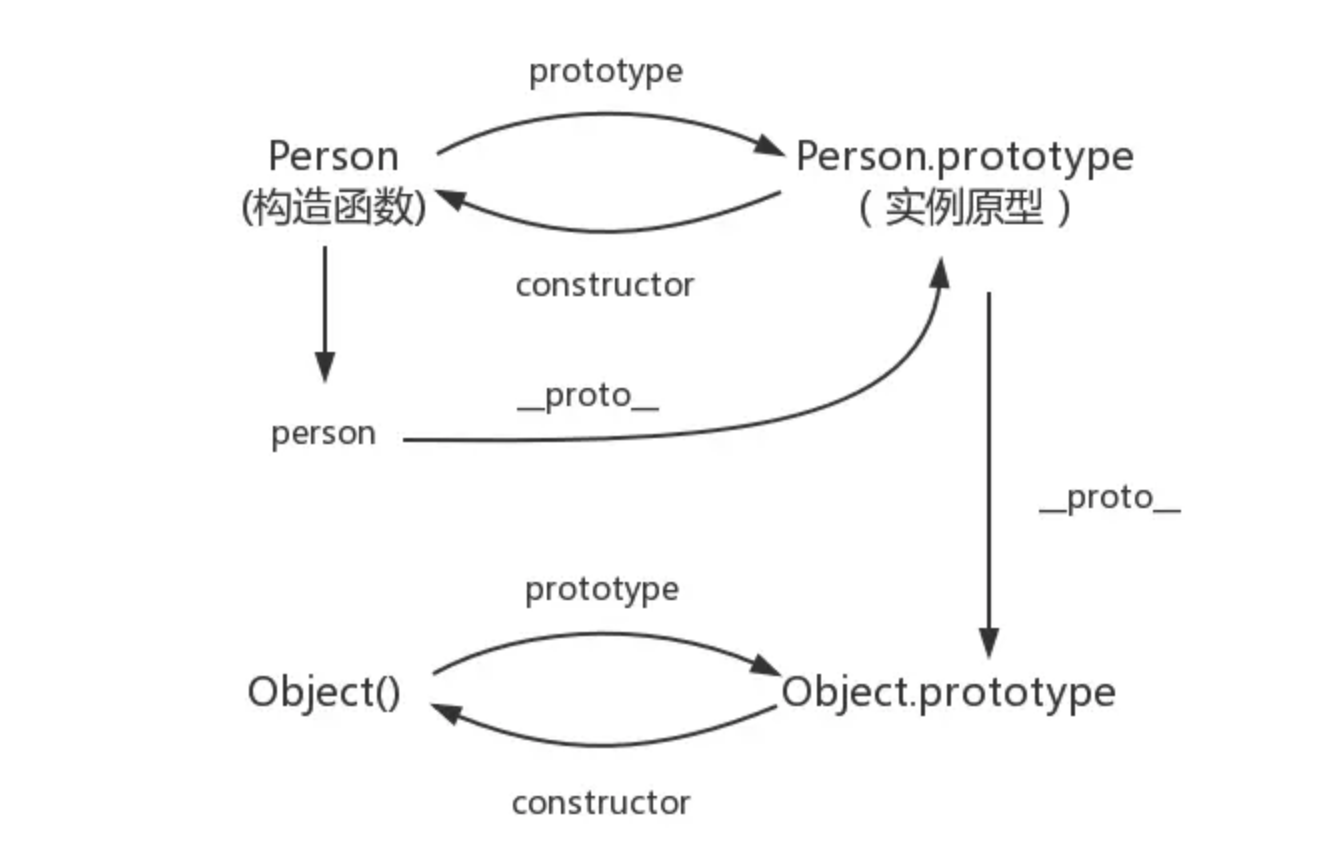
这里每一个实例都拥有Personsay 方法,实例的__proto__指向Person,Personconstructor.prototype还是Person

网上找了个 关系图:

20191029165409

从输入 url 地址到页面相应都发生了什么

1
2
3
4
5
6
7
1、浏览器的地址栏输入URL并按下回车。
2、浏览器查找当前URL是否存在缓存,并比较缓存是否过期。3、DNS解析URL对应的IP。
4、根据IP建立TCP连接(三次握手)。
5、HTTP发起请求。
6、服务器处理请求,浏览器接收HTTP响应。
7、渲染页面,构建DOM树。
8、关闭TCP连接(四次挥手)

保存位置

cookie,sessionStorage,localStorage 都是保存在浏览器端的,session是保存在服务器端的

使用方式

(1)cookie机制:如果不在浏览器中设置过期时间,cookie被保存在内存中,生命周期随浏览器的关闭而结束,这种cookie简称会话cookie。如果在浏览器中设置了cookie的过期时间,cookie被保存在硬盘中,关闭浏览器后,cookie数据仍然存在,直到过期时间结束才消失。

Cookie是服务器发给客户端的特殊信息,cookie是以文本的方式保存在客户端,每次请求时都带上它

(2)session机制:当服务器收到请求需要创建session对象时,首先会检查客户端请求中是否包含sessionid。如果有sessionid,服务器将根据该id返回对应session对象。如果客户端请求中没有sessionid,服务器会创建新的session对象,并把sessionid在本次响应中返回给客户端。通常使用cookie方式存储sessionid到客户端,在交互中浏览器按照规则将sessionid发送给服务器。

存储内容

cookie只能保存字符串类型,以文本的方式;session通过类似与Hashtable的数据结构来保存,能支持任何类型的对象(session中可含有多个对象)

存储的大小

cookie:单个cookie保存的数据不能超过4kbsession大小没有限制。

安全性

cookie:针对cookie所存在的攻击:Cookie 欺骗,Cookie 截获;session的安全性大于cookie

原因如下:
(1)sessionID存储在cookie中,若要攻破session首先要攻破cookie
(2)sessionID是要有人登录,或者启动session_start才会有,所以攻破cookie也不一定能得到sessionID
(3)第二次启动session_start后,前一次的sessionID就是失效了,session过期后,sessionID也随之失效。
(4)sessionID是加密的
(5)综上所述,攻击者必须在短时间内攻破加密的sessionID,这很难。

应用场景

  • cookie:
    (1)判断用户是否登陆过网站,以便下次登录时能够实现自动登录(或者记住密码)。如果我们删除cookie,则每次登录必须从新填写登录的相关信息。
    (2)保存上次登录的时间等信息。
    (3)保存上次查看的页面
    (4)浏览计数

  • session:Session用于保存每个用户的专用信息,变量的值保存在服务器端,通过SessionID来区分不同的客户。
    (1)网上商城中的购物车
    (2)保存用户登录信息
    (3)将某些数据放入session中,供同一用户的不同页面使用
    (4)防止用户非法登录

缺点

  • cookie:
    (1)大小受限
    (2)用户可以操作(禁用)cookie,使功能受限
    (3)安全性较低
    (4)有些状态不可能保存在客户端。
    (5)每次访问都要传送 cookie 给服务器,浪费带宽。
    (6)cookie 数据有路径(path)的概念,可以限制 cookie 只属于某个路径下。

  • session:
    (1)Session 保存的东西越多,就越占用服务器内存,对于用户在线人数较多的网站,服务器的内存压力会比较大。
    (2)依赖于 cookie(sessionID 保存在 cookie),如果禁用 cookie,则要使用 URL 重写,不安全
    (3)创建 Session 变量有很大的随意性,可随时调用,不需要开发者做精确地处理,所以,过度使用 session 变量将会导致代码不可读而且不好维护。

好了,下面再说说localStorage(本地存储)和sessionStorage(会话存储)。

生命周期

  • localStorage:localStorage 的生命周期是永久的,关闭页面或浏览器之后 localStorage 中的数据也不会消失
  • localStorage 除非主动删除数据,否则数据永远不会消失。

sessionStorage的生命周期是在仅在当前会话下有效。sessionStorage引入了一个“浏览器窗口”的概念,sessionStorage是在同源的窗口中始终存在的数据。只要这个浏览器窗口没有关闭,即使刷新页面或者进入同源另一个页面,数据依然存在。但是sessionStorage在关闭了浏览器窗口后就会被销毁。同时独立的打开同一个窗口同一个页面,sessionStorage也是不一样的。

  • 存储大小:
    localStorage 和 sessionStorage 的存储数据大小一般都是:5MB

  • 存储位置:
    localStorage 和 sessionStorage 都保存在客户端,不与服务器进行交互通信。

  • 存储内容类型:
    localStorage 和 sessionStorage 只能存储字符串类型,对于复杂的对象可以使用 ECMAScript 提供的 JSON 对象的 stringify 和 parse 来处理

  • 获取方式:
    localStorage:window.localStorage;;sessionStorage:window.sessionStorage;。

  • 应用场景:
    localStoragese:常用于长期登录(+判断用户是否已登录),适合长期保存在本地的数据。sessionStorage:敏感账号一次性登录;

WebStorage 的优点

(1)存储空间更大:cookie 为 4KB,而 WebStorage 是 5MB;

(2)节省网络流量:WebStorage 不会传送到服务器,存储在本地的数据可以直接获取,也不会像 cookie 一样美词请求都会传送到服务器,所以减少了客户端和服务器端的交互,节省了网络流量;

(3)对于那种只需要在用户浏览一组页面期间保存而关闭浏览器后就可以丢弃的数据,sessionStorage 会非常方便;

(4)快速显示:有的数据存储在 WebStorage 上,再加上浏览器本身的缓存。获取数据时可以从本地获取会比从服务器端获取快得多,所以速度更快;

(5)安全性:WebStorage 不会随着 HTTP header 发送到服务器端,所以安全性相对于 cookie 来说比较高一些,不会担心截获,但是仍然存在伪造问题;

(6)WebStorage 提供了一些方法,数据操作比 cookie 方便;

setItem (key, value) —— 保存数据,以键值对的方式储存信息。

getItem (key) —— 获取数据,将键值传入,即可获取到对应的 value 值。

removeItem (key) —— 删除单个数据,根据键值移除对应的信息。

clear () —— 删除所有的数据

key (index) —— 获取某个索引的 key

js 中跨域方法

详情请看 多种跨域方案详解 https://yuwangi.github.io/articles/3222442466.html

数组去重的方法

  • 一维数组排序
1
2
3
4
5
6
7
8
9
//利用ES6中的 Set 方法去重
let arr = [1, 0, 0, 2, 9, 8, 3, 1];
function unique(arr) {
console.log(new Set(arr));
return Array.from(new Set(arr));
}
console.log(unique(arr)); // [1,0,2,9,8,3]

console.log(...new Set(arr)); // [1,0,2,9,8,3]
1
2
3
4
5
6
7
8
9
10
11
12
13
14
15
16
17
var arr = [1, 2, 8, 9, 5, 8, 4, 0, 4];
/*
模拟: 原始数组:[1,2,8,9,5,8,4,0,4]
索引值:0,1,2,3,4,5,6,7,8
伪新数组:[1,2,8,9,5,8,4,0,4]
使用indexOf方法找到数组中的元素在元素在中第一次出现的索引值
索引值:0,1,2,3,4,2,6,7,6
返回前后索引值相同的元素:
新数组:[1,2,8,9,5,4,0]
*/
function unique(arr) {
// 如果新数组的当前元素的索引值 == 该元素在原始数组中的第一个索引,则返回当前元素
return arr.filter(function(item, index) {
return arr.indexOf(item, 0) === index;
});
}
console.log(unique(arr)); // 1, 2, 8, 9, 5, 4, 0
  • 多维数组排序
1
2
3
4
5
6
7
8
9
10
11
12
13
14
15
16
17
18
19
20
var temp = [];
function uniq(array) {
var result = [];
recursion(array); // 调用递归将多维数组变为一维数组再去重
return Array.from(new Set(temp));
}
// 新增递归函数
function recursion(array) {
var len = array.length;
for (var i = 0; i < len; i++) {
if (typeof array[i] == "object") {
// 如若数组元素类型是object,则递归
recursion(array[i]);
} else {
temp.push(array[i]); // 否则添加到temp数组中
}
}
}
var arr = [1, [2, 3], [3, 2, [1, 6, [3, 5, "3"]]]];
console.log(uniq(arr));

ajax 的状态码

  • 200: 代表请求成功;
  • 301: 永久重定向;
  • 302: 临时转移
  • 304: 读取缓存 [表示浏览器端有缓存,并且服务端未更新,不再向服务端请求资源]
  • 307: 临时重定向
  • 400: 数据/格式错误
  • 401: 权限不够;(身份不合格,访问网站的时候,登录和不登录是不一样的)
  • 404: 路径错误,找不到文件
  • 500: 服务器的问题
  • 503: 超负荷;

异步解决方案 Promise await promise

定时器、ajax、事件绑定、回调函数、async await、promise

promise:
1.是一个对象,用来传递异步操作的信息。代表着某个未来才会知道结果的时间,并未这个事件提供统一的api,供进异步处理
2.有了这个对象,就可以让异步操作以同步的操作的流程来表达出来,避免层层嵌套的回调地狱
3.promise代表一个异步状态,有三个状态pending(进行中),Resolve(以完成),Reject(失败)
4.一旦状态改变,就不会在变。任何时候都可以得到结果。从进行中变为以完成或者失败
promise.all() 里面状态都改变,那就会输出,得到一个数组
promise.race() 里面只有一个状态变为rejected或者fulfilled即输出
promis.finally()不管指定不管Promise对象最后状态如何,都会执行的操作(本质上还是then方法的特例)

1
2
3
4
5
6
7
8
9
10
11
12
13
14
15
16
17
18
19
20
21
22
23
24
25
26
27
28
29
30
31
32
33
34
35
36
37
38
39
40
41
42
43
44
45
46
47
48
49
50
51
//手写promise
class CutePromise {
constructor(executor) {
// executor是我们实例化CutePromise时传入的参数函数,它接受两个参数,分别是resolve和reject。
// resolve和reject我们将会定义在constructor当中,供executor在执行的时候调用
if (typeof executor !== "function") {
throw new Error("Executor must be a function");
}

this.state = "PENDING";
this.chained = [];
const resolve = res => {
if (this.state !== "PENDING") {
return;
}
this.state = "FULFILLED";
this.internalValue = res;
for (const { onFulfilled } of this.chained) {
onFulfilled(res);
}
};
const reject = err => {
if (this.state !== "PENDING") {
return;
}
this.state = "REJECTED";
this.internalValue = err;
for (const { onRejected } of this.chained) {
onRejected(err);
}
};

try {
executor(resolve, reject);
} catch (err) {
reject(err);
}
}
// 为实例提供一个then的方法,接收两个参数函数,
// 第一个参数函数必传,它会在promise已成功(fulfilled)以后被调用
// 第二个参数非必传,它会在promise已失败(rejected)以后被调用
then(onFulfilled, onRejected) {
if (this.state === "FULFILLED") {
onFulfilled(this.internalValue);
} else if (this.$state === "REJECTED") {
onRejected(this.internalValue);
} else {
this.chained.push({ onFulfilled, onRejected });
}
}
}

测试代码:

1
2
3
4
5
6
7
8
let p = new CutePromise(resolve => {
setTimeout(() => resolve("Hello"), 100);
});
p.then(res => console.log(res));
p = new CutePromise((resolve, reject) => {
setTimeout(() => reject("err"), 100);
});
p.then(() => {}, err => console.log("Async error:", err));

20191029180316.png

事件委托

1
2
3
4
5
6
7
8
9
10
11
12
13
14
15
16
17
18
19
20
21
22
23
24
25
26
27
28
29
30
31
//html
<div id="box">
<input type="button" id="add" value="添加" />
<input type="button" id="remove" value="删除" />
<input type="button" id="move" value="移动" />
<input type="button" id="select" value="选择" />
</div>
//js
window.onload = function(){
var oBox = document.getElementById("box");
oBox.onclick = function (ev) {
var ev = ev || window.event;
var target = ev.target || ev.srcElement;
if(target.nodeName.toLocaleLowerCase() == 'input'){
switch(target.id){
case 'add' :
alert('添加');
break;
case 'remove' :
alert('删除');
break;
case 'move' :
alert('移动');
break;
case 'select' :
alert('选择');
break;
}
}
}
}

垃圾回收机制

垃圾回收机制是为了以防内存泄漏,内存泄漏的含义就是当已经不需要某块内存时这块内存还存在着,垃圾回收机制就是间歇的不定期的寻找到不再使用的变量,并释放掉它们所指向的内存。

垃圾回收方式

  • 标记清除(mark and sweep)

当变量进入执行环境是,就标记这个变量为“进入环境”。从逻辑上讲,永远不能释放进入环境的变量所占用的内存,因为只要执行流进入相应的环境,就可能会用到他们。当变量离开环境时,则将其标记为“离开环境”。
垃圾收集器在运行的时候会给存储在内存中的所有变量都加上标记。然后,它会去掉环境中的变量以及被环境中的变量引用的标记。而在此之后再被加上标记的变量将被视为准备删除的变量,原因是环境中的变量已经无法访问到这些变量了。最后。垃圾收集器完成内存清除工作,销毁那些带标记的值,并回收他们所占用的内存空间。

  • 引用计数(reference counting)

引用计数的含义是跟踪记录每个值被引用的次数。当声明了一个变量并将一个引用类型赋值给该变量时,则这个值的引用次数就是1。相反,如果包含对这个值引用的变量又取得了另外一个值,则这个值的引用次数就减1。当这个引用次数变成0时,则说明没有办法再访问这个值了,因而就可以将其所占的内存空间给收回来。这样,垃圾收集器下次再运行时,它就会释放那些引用次数为0的值所占的内存。

数组循环方法和效率

详情请看这篇文章 https://yuwangi.github.io/articles/341754589.html

setTimeout和Promise区别(宏任务和微任务)

1
2
3
4
5
6
7
8
9
10
11
12
13
setTimeout(function() {
console.log('宏任务setTimeout'); //先遇到setTimeout,将其回调函数注册后分发到宏任务Event Queue
//如果setTimeout设置时间,那它会先把函数放到宏任务Event Table,等时间到了再放入宏任务Event Queue里面
})
new Promise(function(resolve) {
console.log('微任务promise'); //new Promise函数立即执行
resolve();//必须resolve执行才能执行then
}).then(function() {
console.log('微任务then'); //then函数分发到微任务Event Queue
})
console.log('主线程console');

//执行顺序结果: 微任务promise、主线程console、微任务then、宏任务setTimeout

let、const面试题

1
2
3
4
5
6
7
//var
for(var i=0;i<=5;i++){
setTimeout(function timer(){
console.log(i)
},i*1000)
}
console.log(i)// 6 6 6 6 6
1
2
3
4
5
6
7
8
//var
for(var i=0;i<=5;i++){
(function(j){
setTimeout(function timer(){
console.log(j)
},j*1000)
})()// 6 6 6 6 6
}
1
2
3
4
5
6
7
8
//var
for(var i=0;i<=5;i++){
(function(j){
setTimeout(function timer(){
console.log(j)
},j*1000)
})(i)// 0 1 2 3 4
}
1
2
3
4
5
6
7
//let
let i;
for(i = 0; i < 5; i++){
setTimeout(function(){
console.log(i); // 5 5 5 5 5
},1000)
}
1
2
3
4
5
6
//let
for(let i = 0; i < 5; i++){
setTimeout(function(){
console.log(i); // 0 1 2 3 4
},1000)
}

this作用域试题

这些题请抹去答案后 自己想一下

1
2
3
4
if (true) {
var name = 'zhangsan'
}
console.log(name)
1
2
3
4
if (true) {
let name1 = 'zhangsan'
}
console.log(name1) // 报错,因为let定义的name是在if这个块级作⽤域
1
2
3
4
5
6
7
8
9
10
function aaa(){
a=10;
}
aaa();
function aaa(){
var a=b=10;
}
aaa();
console.log(b)//10
console.log(a)//Uncaught ReferenceError: a is not defined
1
2
3
4
5
6
7
8
9
10
11
12
13
14
15
16
17
18
19
20
21
var name = '222';
var a = {
name : '111',
say : function () {
console.log(this.name)
}
}

var fun = a.say;
fun() //222
a.say() //111

var b = {
name : '333',
say : function (fun) {
fun();
}
}
b.say(a.say); //222
b.say = a.say;
b.say() //333
1
2
3
4
5
6
7
8
9
10
11
12
13
var val = 1
var obj = {
val : 2,
dbl : function() {
var val = 45;
console.log(this); //window
this.val *= 2;
console.log(this.val); //2
console.log(val); //45
}
}
var fn = obj.dbl
fn()
1
2
3
4
5
var x = 12;
function test() {
console.log(this.x)
}
test() //12
1
2
3
4
5
6
7
8
9
var x = 12;
function test() {
console.log(this.x)
}
var obj={
x:45,
ss:test
}
obj.ss() //45
1
2
3
4
5
6
7
8
9
10
11
12
var x = 12;
function test() {
console.log(this.x)//12
}
var obj = {
x:45,
ss:function(){
console.log(this)
test()
}
}
obj.ss() //{x: 45, ss: ƒ}
1
2
3
4
5
6
7
8
9
10
11
12
var val = 1
var obj = {
val : 2,
dbl : function() {
// var val = 45;
console.log(this); // {val: 2, dbl: ƒ}
this.val *= 2;
console.log(this.val); // 4
console.log(val); // 1
}
}
var ff = obj.dbl()
1
2
3
```

```js
1
2
3
```

```js
1
2
3
```

```js
1
2
3
```

```js
1
2
3
```

```js
1
2
3
```

```js
1
2
3
```

```js
1
2
3
```

```js
1
2
3
```

```js
1
2
3
```

```js
1
2
3
```

```js
1
2
3
```

```js
1
2
3
```

```js
1
2
3
```

```js
1
2
3
```

```js
1
2
3
```

```js
1
2
3
```

```js
1
2
3
```

```js
1
2
3
```

```js
1
2
3
```

```js
1
2
3
```

```js
1
2
3
```

```js
1
2
3
```

```js
1
2
3
```

```js
1
2
3
```

```js
1
2
3
```

```js
1
2
3
```

```js
1
2
3
```

```js
1
2
3
```

```js
1
2
3
```

```js
1
2
3
```

```js
1
2
3
```

```js
1
2
3
```

```js
1
2
3
```

```js
1
2
3
```

```js
1
2
3
```

```js
1
2
3
```

```js
1
2
3
```

```js
1
2
3
```

```js
1
2
3
```

```js
1
2
3
```

```js
1
2
3
```

```js
1
2
3
```

```js
1
2
3
```

```js
1
2
3
```

```js
1
2
3
```

```js
1
2
3
```

```js
1
2
3
```

```js
1
2
3
```

```js
1
2
3
```

```js
1
2
3
```

```js
1
2
3
```

```js
1
2
3
```

```js